Handling and Storage
Manual off-loading is only advisable on small sites. One man may carry small boards, but generally two men will be required and this will reduce the risk of damage to the boards. When off-loading manually boards must always be carried on edge.
The boards should always be stored in a dry & covered place, sheltered from rain. They should be supported on wooden battens, to avoid dampness from floors. These battens should not be more than 45 cms apart on a flat surface. Gypboard should never be stacked on edge for long periods as this can cause deformation.
Cutting
Gypboards can easily be cut either longitudinally or transversely. A cut should be made in the face side of the board by means of a retractable knife. A line may be ruled prior to cutting, or with practice. The rule may be drawn down the board at the required distance from the edge whilst the board is scored with a knife at the end of the rule. The board should then be pressed with both hands and the gypsum core will break in line with the cut in the side face. The board should then be turned over and the other side paper be cut with the knife.
Sawing
Gypboard may be cut using a normal saw. A fret saw or an electric tool may also be used for cutting of curves. When large quantities of board are to be cut, the use of a circular handsaw is advisable.
Making holes/ cut-outs
Electrical or manual carpenters’ tools may be used for making cut-outs. Drills should be used when making holes for electrical installations. For holes of diameter less than 50mm a high-speed still drill gives a better result.
Planing
The edges of the board can be pared off using a plane. A file may also be used to level off any irregularities, which may remain after cutting. The edges of both paper faces may be trimmed up if necessary using fine sandpaper.
Bending
Gypboard may also be used to line curved areas. The curvature radius will be 60cms for 9.5mm Gypboard. Both sides of the Gypboard should be sprayed with water until they are damp. The board should then be bent very slowly and carefully, and fixed into position. Before jointing, the boards should be completely dry.
Jointing and Finishing
Gypboard is available with two different types of edge finish. The longitudinal edge may be tapered or square, depending on the type of application and the convenience of using one or another finish. Tapered edge board gives an invisible joint, the gap between each board being filled and finished in such a way that the lining or partitions present a continuous, smooth and seamless surface. Square edge board can be used when visible joint system is required incorporating a surface joint strip, or where the board is required to be incorporated into a metal grid suspended ceiling system.

Process of Jointing & Finishing
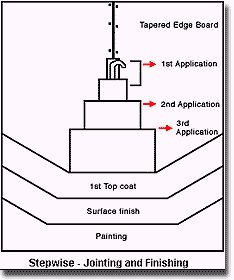
1st application-- Embedding of paper tape into joints by using taping knife.
2nd application -- After first application is dried. Second finishing coat is applied
3rd application -- Final finishing coat application followed with topcoat.
TOOLS TO BE USED BY TRADESMEN
Required tools at site for gypsum works are illustrated below:
The Gypboard range of accessories is designed to facilitate ease of handling. Ordinary tools can be used to cut and work with this versatile material. However, to ensure more efficient handling and a better finish, an extensive range of accessories are available.
Taping Knife

100 mm wide taping knife, flexible steel bladed knife for embedding joint tape.
Applicator

200 mm wide rigid bakelite blade with plastic grip for applying Gypboard jointing compound.
Foot Lifter

For holding Gypboards in position tight against ceiling leaving hands free for fixing.
Electric Drill with Clutch Attachments

Converts standard electric drill to a power screwdriver suitable for fixing Gypboard to metal frame system.
Stud Interlocking Tools
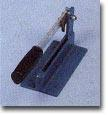
Simple action punches through stud to lock two lengths together when using boxed or extended studs.
Crimping Tool

Punches and locks together 0.55 mm sections. Used for crimping at the base and head of the partition or separating wall. Also used in Gypboard steel beam and column encasement system.
Holding Clips
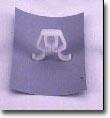
These holding clips are made of PVC in white colour. It can be used for both, 12.5 mm and 9.5 mm Ceiling Panels.
Rawl plug
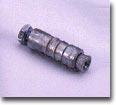
It is of 12 mm diameter and 38mm long expandable aluminium alloy fastener. It is used to hold, the suspended ceiling at 1220 mm in both directions. Each rawl plug can take load of up to 25 kg.
Connecting Clip

2.64 mm diameter spring steel wire made to suit and hold the ceiling section & intermediate channel together to form a regular frame.
Soffit Cleat
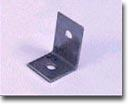
1.8 mm thick and 25 mm wide G.I. Angle with two unequal legs of 27 and 35 mm. Each leg has a hole of 6.5mm in its centre to hold the rawl plug and G.I. angle.
Drywall Screws
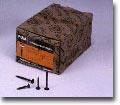
Dry wall screws are self-drilling and self-tapping with counter sunk Philips head. These are either oxidized or galvanized to avoid rusting.
Joint Paper Tape
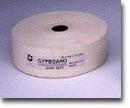
A paper tape of reinforcing tapered edge joints and internal angles in both manual and mechanical jointing systems. It has a centre crease, chamfered edges and slit perforation in four rows. Supplied in 120 mtr x 53 mm rolls, ten rolls to a pack.
Level Adjuster
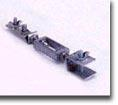
Made of metal size 50 x 25 mm. It is used at 1220 mm c/c to hold the H.D. tube section.
Level Clip
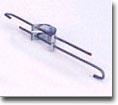
Level clip comprises of clip and G.I. wire of 4 mm diameter. The clip is made of spring steel with two equal flanges and holes to suit the wire. It is used in fine line ceiling system to suspend main 'T' from soffit at 1220 mm c/c.
INSPECTION METHODOLOGY FOR QUALITY ASSURANCE
1. Check for line level plumb using the same tools used for block masonry.
2. Ensure the joints are recessed to 4 mm to 5 mm at the joints to the width of the fibre mesh.
3. Ensure fibre-mesh / paper tape is fixed for all joints and horizontal corners.
4. Ensure gypsum corner beads are fixed at all vertical joints.
5. Gap between two boards should not exceed more than 5 mm.
6. Ensure joints of two Gypboards are treated with only jointing compound of Indian Gypsum Limited and not Plaster of Paris (POP).
7. Ensure horizontal bracings are provided for GI frame in partitions of more than 3m high.
8. Ensure horizontal bracings are provided for GI frame in slender partitions or places where switch plates, wall mounted fixtures, etc are fixed.
9. Avoid gypsum walls and partitions in water prone areas like toilets, pantry kitchen etc.
10. The dust from sanding at the joints should be removed either using soft cloth or soft broom before start of painting works.
11. Ensure fisher plug with 35mm long GI screws are used for perimeter channel fixing and black star screws of 25mm are used for fixing boards.
12. For prevention of cracks at joints ensure that:
TOOLS TO BE USED FOR QUALITY INSPECTION
1. Plumb bob
2. Spirit levels 3m
3. Right angle
4. Measuring tape
5. Related “Good for Construction” drawings
Manual off-loading is only advisable on small sites. One man may carry small boards, but generally two men will be required and this will reduce the risk of damage to the boards. When off-loading manually boards must always be carried on edge.
The boards should always be stored in a dry & covered place, sheltered from rain. They should be supported on wooden battens, to avoid dampness from floors. These battens should not be more than 45 cms apart on a flat surface. Gypboard should never be stacked on edge for long periods as this can cause deformation.
Cutting
Gypboards can easily be cut either longitudinally or transversely. A cut should be made in the face side of the board by means of a retractable knife. A line may be ruled prior to cutting, or with practice. The rule may be drawn down the board at the required distance from the edge whilst the board is scored with a knife at the end of the rule. The board should then be pressed with both hands and the gypsum core will break in line with the cut in the side face. The board should then be turned over and the other side paper be cut with the knife.
Sawing
Gypboard may be cut using a normal saw. A fret saw or an electric tool may also be used for cutting of curves. When large quantities of board are to be cut, the use of a circular handsaw is advisable.
Making holes/ cut-outs
Electrical or manual carpenters’ tools may be used for making cut-outs. Drills should be used when making holes for electrical installations. For holes of diameter less than 50mm a high-speed still drill gives a better result.
Planing
The edges of the board can be pared off using a plane. A file may also be used to level off any irregularities, which may remain after cutting. The edges of both paper faces may be trimmed up if necessary using fine sandpaper.
Bending
Gypboard may also be used to line curved areas. The curvature radius will be 60cms for 9.5mm Gypboard. Both sides of the Gypboard should be sprayed with water until they are damp. The board should then be bent very slowly and carefully, and fixed into position. Before jointing, the boards should be completely dry.
Jointing and Finishing
Gypboard is available with two different types of edge finish. The longitudinal edge may be tapered or square, depending on the type of application and the convenience of using one or another finish. Tapered edge board gives an invisible joint, the gap between each board being filled and finished in such a way that the lining or partitions present a continuous, smooth and seamless surface. Square edge board can be used when visible joint system is required incorporating a surface joint strip, or where the board is required to be incorporated into a metal grid suspended ceiling system.

Process of Jointing & Finishing
1st application-- Embedding of paper tape into joints by using taping knife.
2nd application -- After first application is dried. Second finishing coat is applied
3rd application -- Final finishing coat application followed with topcoat.

TOOLS TO BE USED BY TRADESMEN
Required tools at site for gypsum works are illustrated below:
The Gypboard range of accessories is designed to facilitate ease of handling. Ordinary tools can be used to cut and work with this versatile material. However, to ensure more efficient handling and a better finish, an extensive range of accessories are available.
Taping Knife

100 mm wide taping knife, flexible steel bladed knife for embedding joint tape.
Applicator

200 mm wide rigid bakelite blade with plastic grip for applying Gypboard jointing compound.
Foot Lifter

For holding Gypboards in position tight against ceiling leaving hands free for fixing.
Electric Drill with Clutch Attachments

Converts standard electric drill to a power screwdriver suitable for fixing Gypboard to metal frame system.
Stud Interlocking Tools

Simple action punches through stud to lock two lengths together when using boxed or extended studs.
Crimping Tool

Punches and locks together 0.55 mm sections. Used for crimping at the base and head of the partition or separating wall. Also used in Gypboard steel beam and column encasement system.
Holding Clips

These holding clips are made of PVC in white colour. It can be used for both, 12.5 mm and 9.5 mm Ceiling Panels.
Rawl plug

It is of 12 mm diameter and 38mm long expandable aluminium alloy fastener. It is used to hold, the suspended ceiling at 1220 mm in both directions. Each rawl plug can take load of up to 25 kg.
Connecting Clip

2.64 mm diameter spring steel wire made to suit and hold the ceiling section & intermediate channel together to form a regular frame.
Soffit Cleat

1.8 mm thick and 25 mm wide G.I. Angle with two unequal legs of 27 and 35 mm. Each leg has a hole of 6.5mm in its centre to hold the rawl plug and G.I. angle.
Drywall Screws

Dry wall screws are self-drilling and self-tapping with counter sunk Philips head. These are either oxidized or galvanized to avoid rusting.
Joint Paper Tape

A paper tape of reinforcing tapered edge joints and internal angles in both manual and mechanical jointing systems. It has a centre crease, chamfered edges and slit perforation in four rows. Supplied in 120 mtr x 53 mm rolls, ten rolls to a pack.
Level Adjuster

Made of metal size 50 x 25 mm. It is used at 1220 mm c/c to hold the H.D. tube section.
Level Clip

Level clip comprises of clip and G.I. wire of 4 mm diameter. The clip is made of spring steel with two equal flanges and holes to suit the wire. It is used in fine line ceiling system to suspend main 'T' from soffit at 1220 mm c/c.
INSPECTION METHODOLOGY FOR QUALITY ASSURANCE
1. Check for line level plumb using the same tools used for block masonry.
2. Ensure the joints are recessed to 4 mm to 5 mm at the joints to the width of the fibre mesh.
3. Ensure fibre-mesh / paper tape is fixed for all joints and horizontal corners.
4. Ensure gypsum corner beads are fixed at all vertical joints.
5. Gap between two boards should not exceed more than 5 mm.
6. Ensure joints of two Gypboards are treated with only jointing compound of Indian Gypsum Limited and not Plaster of Paris (POP).
7. Ensure horizontal bracings are provided for GI frame in partitions of more than 3m high.
8. Ensure horizontal bracings are provided for GI frame in slender partitions or places where switch plates, wall mounted fixtures, etc are fixed.
9. Avoid gypsum walls and partitions in water prone areas like toilets, pantry kitchen etc.
10. The dust from sanding at the joints should be removed either using soft cloth or soft broom before start of painting works.
11. Ensure fisher plug with 35mm long GI screws are used for perimeter channel fixing and black star screws of 25mm are used for fixing boards.
12. For prevention of cracks at joints ensure that:
- Paper tape is used and pressed properly at the joints.
- 'V' grove is cut & filled properly at square edge joint.
- Drywall screws are properly driven with clutch attachment, arresting movement between board & frame.
- Vibrations of A.C. duct/ generators are not passing onto the ceiling/ partitions.
TOOLS TO BE USED FOR QUALITY INSPECTION
1. Plumb bob
2. Spirit levels 3m
3. Right angle
4. Measuring tape
5. Related “Good for Construction” drawings
