How to do concrete sampling and cube casting
If sampling and cube casting goes wrong, end result of it goes wrong and can create a panic.
Concrete cube casting is most important activity as we judge the concrete in place by testing the cubes casted for it.
Sample concrete can be taken from following locations for cube casting
At Transit mixer – when concrete is unloaded to placing location / concrete pump hopper through transit mixer. You can take direct sample concrete from the transit mixer in a tray or in wheel barrow.
The sample concrete should be taken such a way that, it represents total concrete of transit mixer i.e. – take at start of unloading, take another when its half unloaded and take the sample when it is almost to empty.
Mix this concrete in a tray or wheel barrow to get uniform homogeneity in mix.
At Placing location – mostly in case of pump concrete and in slabs, where you choose to take sample at placing location. When the concrete is pumped and poured in slab, you need to take sample from various locations from poured concrete quantity i.e. – take some from center, middle and from end portions of poured concrete.
Mix this concrete in a tray to get uniform homogeneity in mix.
At Production Location - This is mostly in cases where weight batcher is installed at site to produce small amount of concrete for column and wall casting. You can take sample from mixer drum same way as described for Transit Mixer.
It is important to cast the cubes of concrete when its apparent slump is around 100 to 120 mm.
The cubes sizes are small compare to actual structure sizes and hurdles in pouring for which the extra slump is designed. Waiting for drop in slump does not actually modifies the property of concrete as the slump gain was due to addition of admixture and with time the cells are breaking down to allow cement to react with water.
If you fill the cubes at higher slump, chances are more to get aggregates settle down at bottom and the slurry comes at which will leads to weaker layer in cube and easily gets peel off under compression and indicates failure in taking further load.
If you cast cubes at very stiff or at lower slumps, it will lead to improper cube casting due to more efforts required for compaction and also the de-moulded cubes will scare you by its finish faces.
From each sample, 3 cubes need to be casted as per following procedure;
The cubes are generally of 150mm, and casted in 3 layers.
Cubes should be properly oiled to ensure easy de-moulding, the oiling should be such a way that, oil should not be accumulate or visible in thick formation. Very thin light coat of oil should be applied on it.
Do check dimensions of cubes for its correctness, it is one of the culprit in failures or boosting strength parameter.
The sample concrete should be poured in 3 cubes up to 1/3rd height.
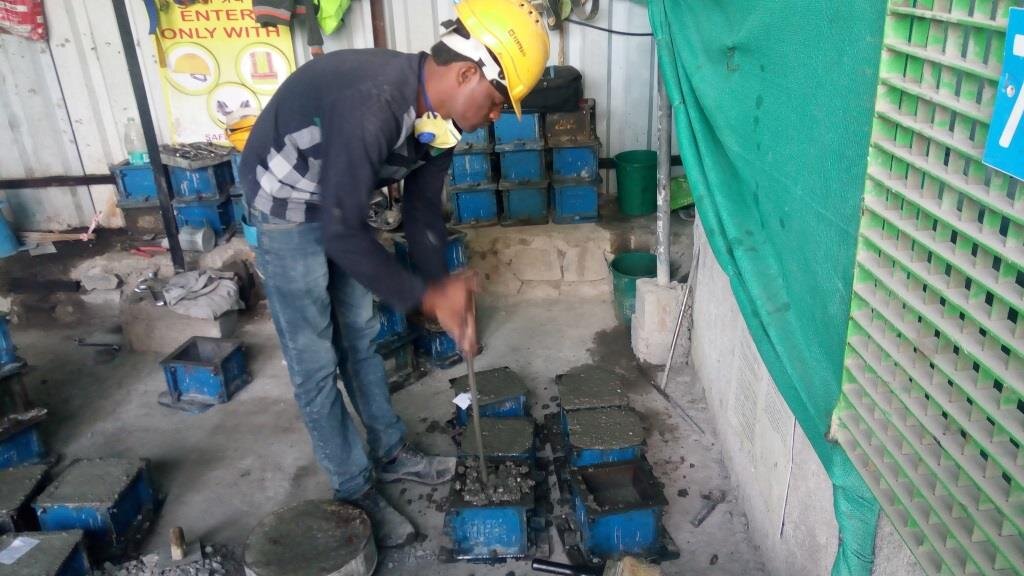
It should be compacted with 16mm round tip rod by tamping it for 35 to 40 times.
Then next layer should be filled in all three cubes and again tamp for 35 to 40 times.
Then remaining layer should be filled and tamped same way.
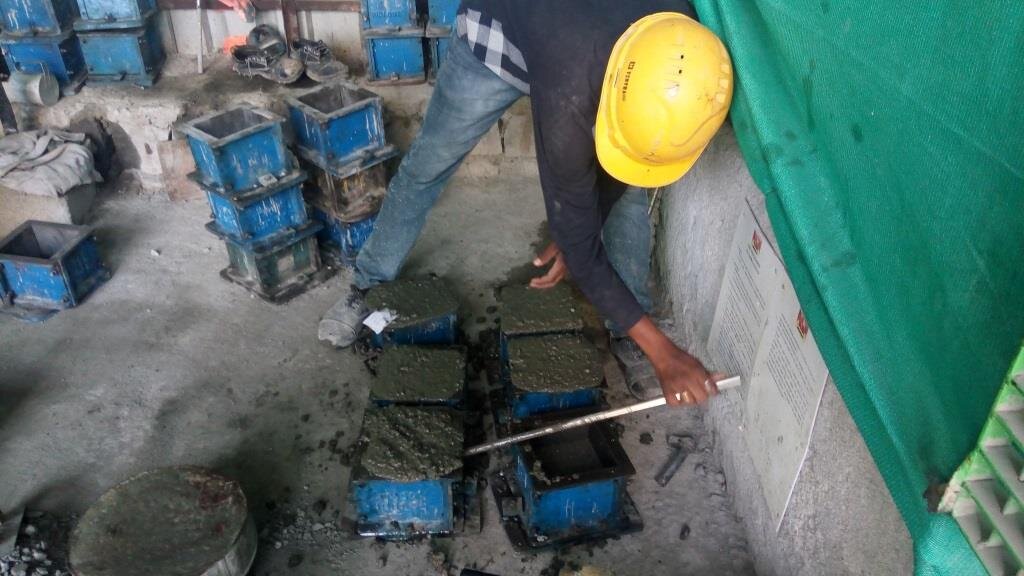
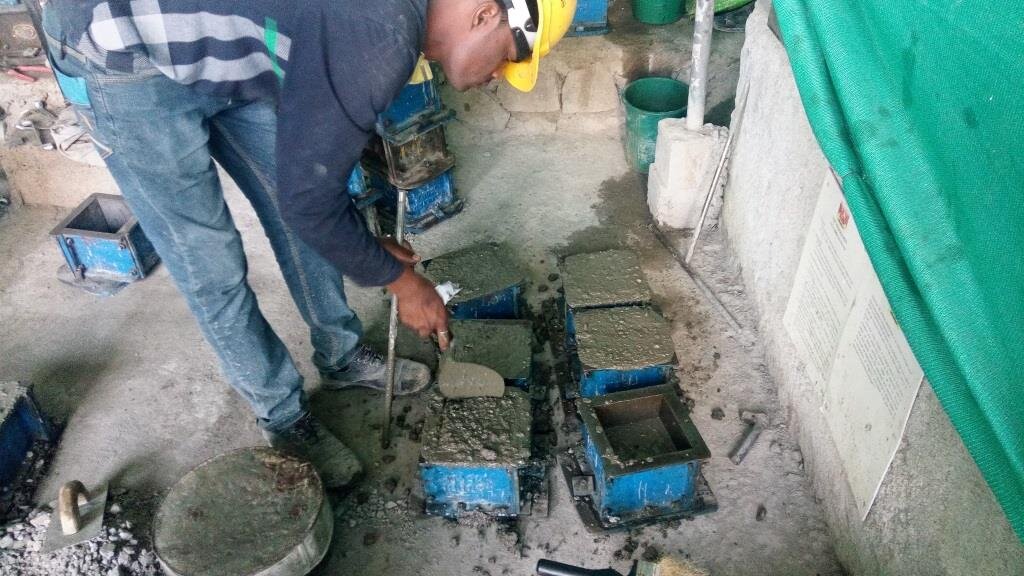
After tamping / compacting each layer – do insert trowel from face of mould and give some jerks on each face. Also tamp mould from outside. This ensure smooth finish of cubes and escaping of entrapped air at faces.
The top layer should be filled slightly more in order to compensate shrinkage and allowing better finish.
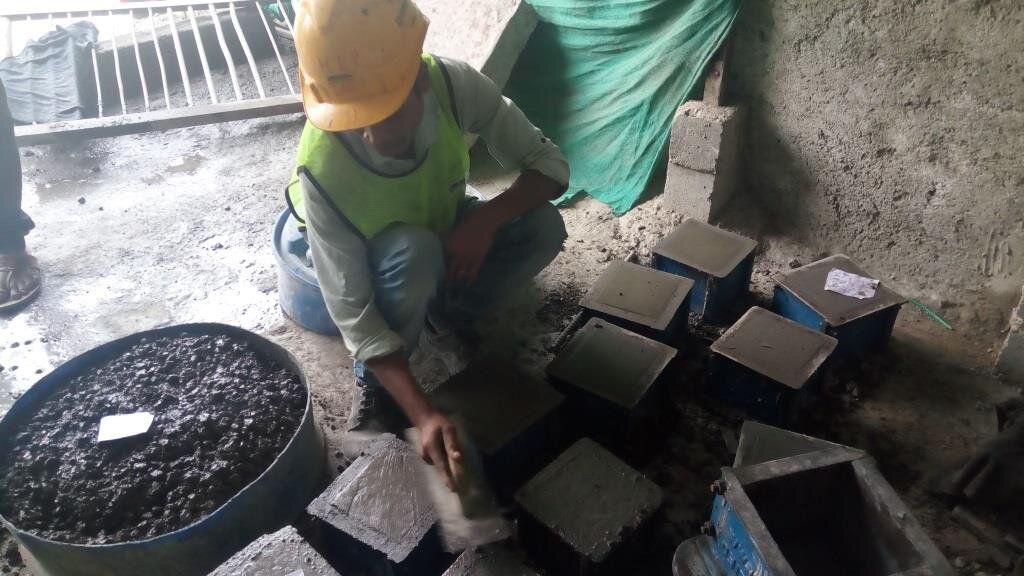
Cubes top should be finished smooth and emboss with details of concrete by any sharp tool. The minimum following details should be written on it
Grade of Concrete
Location
Date
Cube Number
In above details cube number is most important detail, if written improperly. You can’t do statistical analysis as you will not be able to find actual root cause of increased and decreased strength variation.
You can also stick a paper note on it with all details, if its late night work and does not get time for embossing details on it (paper will also be remaining there without getting damaged, even if we take out cubes after 28 days from curing tank).
Some photos in action
Tamping of concrete layer

Jerking cube from out side to release entrapped air.

Inserting trowel on the face of mould to ensure smooth finish and releasing entrapped air.
Finishing of cube top surface.

After 16 to 24 hours of cube casting, it can be de-moulded and put into curing tank for curing by recording details of it.
For sampling frequency, you can follow any standards or you can make your own.
IS 456, Do suggest following frequencies of sampling. It also states, in all cases only 28 day’s cube results are considered for acceptance or rejection of concrete (Better to have you own set standards for frequency of sampling, more samples lead to more authentic data on concrete properties)
For concrete quantity between 1 to 5 cum – 1 sample should be taken
For concrete quantity between 6 to 15 cum – 2 sample should be taken
For concrete quantity between 16 to 30 cum – 3 sample should be taken
For concrete quantity between 31 to 50 cum – 4 sample should be taken
51 and above – 4 plus one additional sample for each additional 50 cum.
If sampling and cube casting goes wrong, end result of it goes wrong and can create a panic.
Concrete cube casting is most important activity as we judge the concrete in place by testing the cubes casted for it.
Sample concrete can be taken from following locations for cube casting
At Transit mixer – when concrete is unloaded to placing location / concrete pump hopper through transit mixer. You can take direct sample concrete from the transit mixer in a tray or in wheel barrow.
The sample concrete should be taken such a way that, it represents total concrete of transit mixer i.e. – take at start of unloading, take another when its half unloaded and take the sample when it is almost to empty.
Mix this concrete in a tray or wheel barrow to get uniform homogeneity in mix.
At Placing location – mostly in case of pump concrete and in slabs, where you choose to take sample at placing location. When the concrete is pumped and poured in slab, you need to take sample from various locations from poured concrete quantity i.e. – take some from center, middle and from end portions of poured concrete.
Mix this concrete in a tray to get uniform homogeneity in mix.
At Production Location - This is mostly in cases where weight batcher is installed at site to produce small amount of concrete for column and wall casting. You can take sample from mixer drum same way as described for Transit Mixer.
It is important to cast the cubes of concrete when its apparent slump is around 100 to 120 mm.
The cubes sizes are small compare to actual structure sizes and hurdles in pouring for which the extra slump is designed. Waiting for drop in slump does not actually modifies the property of concrete as the slump gain was due to addition of admixture and with time the cells are breaking down to allow cement to react with water.
If you fill the cubes at higher slump, chances are more to get aggregates settle down at bottom and the slurry comes at which will leads to weaker layer in cube and easily gets peel off under compression and indicates failure in taking further load.
If you cast cubes at very stiff or at lower slumps, it will lead to improper cube casting due to more efforts required for compaction and also the de-moulded cubes will scare you by its finish faces.
From each sample, 3 cubes need to be casted as per following procedure;
The cubes are generally of 150mm, and casted in 3 layers.
Cubes should be properly oiled to ensure easy de-moulding, the oiling should be such a way that, oil should not be accumulate or visible in thick formation. Very thin light coat of oil should be applied on it.
Do check dimensions of cubes for its correctness, it is one of the culprit in failures or boosting strength parameter.
The sample concrete should be poured in 3 cubes up to 1/3rd height.
It should be compacted with 16mm round tip rod by tamping it for 35 to 40 times.
Then next layer should be filled in all three cubes and again tamp for 35 to 40 times.
Then remaining layer should be filled and tamped same way.
After tamping / compacting each layer – do insert trowel from face of mould and give some jerks on each face. Also tamp mould from outside. This ensure smooth finish of cubes and escaping of entrapped air at faces.
The top layer should be filled slightly more in order to compensate shrinkage and allowing better finish.
Cubes top should be finished smooth and emboss with details of concrete by any sharp tool. The minimum following details should be written on it
Grade of Concrete
Location
Date
Cube Number
In above details cube number is most important detail, if written improperly. You can’t do statistical analysis as you will not be able to find actual root cause of increased and decreased strength variation.
You can also stick a paper note on it with all details, if its late night work and does not get time for embossing details on it (paper will also be remaining there without getting damaged, even if we take out cubes after 28 days from curing tank).
Some photos in action
Tamping of concrete layer

Jerking cube from out side to release entrapped air.

Inserting trowel on the face of mould to ensure smooth finish and releasing entrapped air.

Finishing of cube top surface.

After 16 to 24 hours of cube casting, it can be de-moulded and put into curing tank for curing by recording details of it.
For sampling frequency, you can follow any standards or you can make your own.
IS 456, Do suggest following frequencies of sampling. It also states, in all cases only 28 day’s cube results are considered for acceptance or rejection of concrete (Better to have you own set standards for frequency of sampling, more samples lead to more authentic data on concrete properties)
For concrete quantity between 1 to 5 cum – 1 sample should be taken
For concrete quantity between 6 to 15 cum – 2 sample should be taken
For concrete quantity between 16 to 30 cum – 3 sample should be taken
For concrete quantity between 31 to 50 cum – 4 sample should be taken
51 and above – 4 plus one additional sample for each additional 50 cum.
